Since its release a couple of years back, Chromium OS has been a favorite among low-end/old PC owners, with its simple, no-nonsense interface, cost free nature and fast and efficient performance. But with no official build from Google many have taken upon themselves to build Chromium OS. One of the better ones is Neverware CloudReady, providing a near Chrome OS interface, stable builds and regular updates. Although clean and efficient, it can be a right pain in the rear when installing with its non-standard “BIN” file format and eye watering amount of partitions. It can drive one insane if you plan to install it in a VM. That’s why you came here!
After scouring the internet for instructions on installing it on VMware Workstation, we came to a conclusion that there is no official (or for that matter, straightforward and proven) way to install it. Most people claim that they can use the linux tool “dd” to dump it. But on our tests we found that to be a tad bit difficult and time consuming (seeing as how one will need linux and quite a lot of time). So we brew our own portion: a straightforward, fool-proof method of installing Clouready on VMware products (tests on VirtualBox proved futile (no graphics) and only sometimes worked in Parallels). It’s so fool proof that you don’t even need VT-x/AMD-v. How cool is that?
To begin with, you’ll need a (separate) VM with either Windows, Mac or Linux already installed. Then you will need a marvelous little tool called Etcher (Available for all above mentioned OSs). Also, we found that working with the 32bit version of CloudReady plays better than the 64bit version (But the 64bit version is quite alright if you have a sufficiently powerful PC (with VT-x/AMD-v)that can run 64bit guests). And you will quite obviously need a VMware Product (Fusion, Workstation Player/Pro, ESXi etc.). We’ll be using VMware Fusion on an iMac Pro with a secondary Windows VM.
Note: a simplified summary of the entire process is at the bottom of the post. And here’s the accompanying video.
|Etcher|
First, extract the BIN file out of the ZIP file you downloaded into one of the shared folders of your Windows/Linux/Mac VM.
Create a VM (for Cloudready) [“linux 3.x”, minimum 724MB RAM, 20GB SATA Disk, minimum 64MB Video Memory, Accelerated Graphics, USB 3.0 controller, no Optical Drive, EFI Boot enabled (no secure boot), NAT Network Adapter]
Now assign the disk you made in the above step on to the Windows/Linux/Mac VM and power that on.
When the VM has finished powering up, initialize the new disk (using Diskpart, Disk Utilities, fdisk, GParted etc.) with an MBR partition table (I did not make a typo. That is MBR not GPT), and format it as NTFS/EXT4/FAT32.
Then open Etcher inside the VM. Click on the cog wheel (Settings icon) on the top right corner.

Now set it to “Unsafe Mode” (and also disable “validate write”, to speed up the whole process)
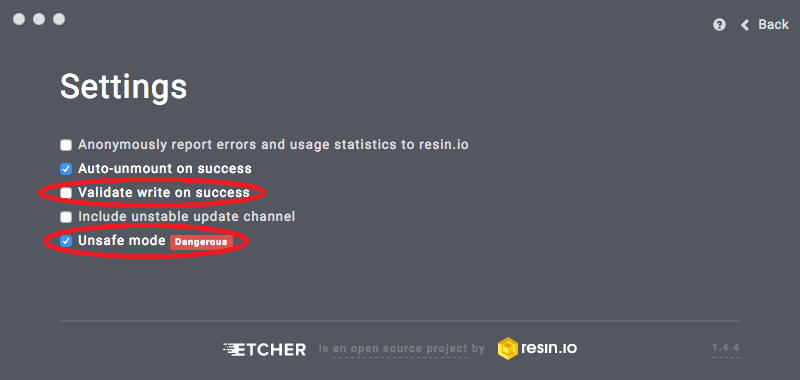
Click back. Choose the ClouReady BIN file and the disk from the ClouReady VM and click flash.
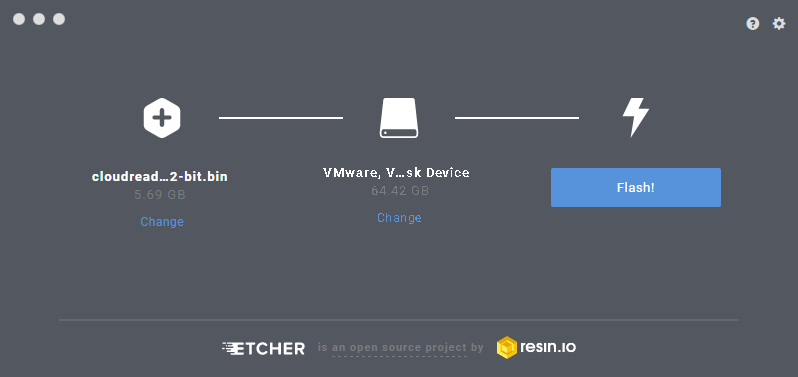
The flash will take anything between 30 Seconds to 30 minutes. Once it finishes the flash, shutdown that VM and remove the CloudReady VM’s disk.
Now focus on the CloudReady VM. Open its VMX file (using a text editor) and put the following line at the end on the file (with the quotes on “FALSE”).
mouse.vusb.startConnected = “FALSE”
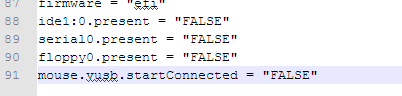
[If you’re worried what it’ll do: CloudReady has a mouse bug that makes it impossible to direct mouse clicks. This is technically the same as turning off “Mouse Integration” in VBox]
Save the VMX file and poweron the CloudReady VM. You will first get a fleeting glance at the CloudReady logo and the Startup screen in which you can login to your Google account.

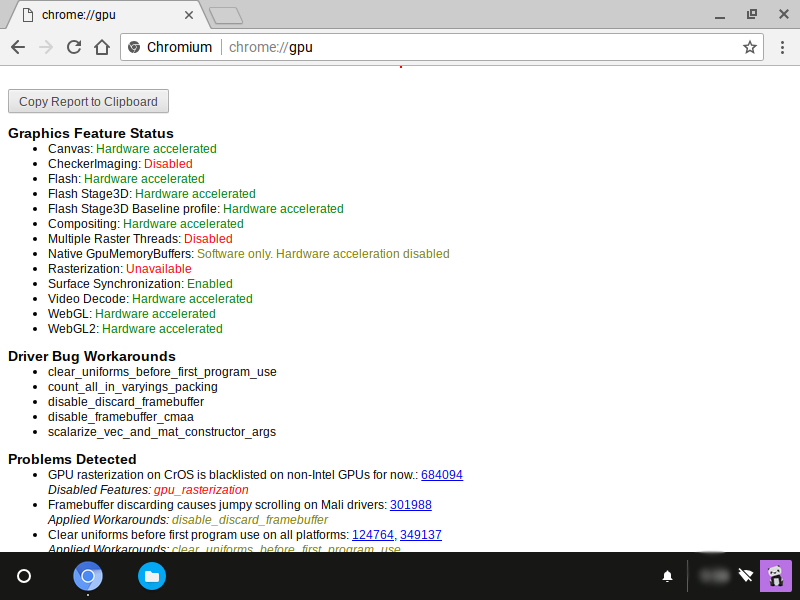
CloudReady plays best with VMware. It’s even got full WebGL 2 Hardware Accelaration.
If you found that a bit confusing, he’s the summary: Get Etcher, CR (CloudReady) 32bit image, VMware virtualization product and a separate Windows VM (not the one that you install CR in).
Attach disk of the CR VM to the Windows VM.
Use Etcher to image the CR BIN file to that disk.
Remove disk from Windows VM, attach to CR VM, Power on CR VM. Done!

I wanted to thank you for this very good read!! I absolutely loved every bit of it. I have you bookmarked to look at new things you post…|
LikeLike
Right away I am going to do my breakfast, once having my breakfast coming over again to read additional news.|
LikeLike
Informative article, totally what I needed.|
LikeLike
Hi there! This article could not be written much better! Looking at this article reminds me of my previous roommate! He continually kept preaching about this. I am going to forward this post to him. Fairly certain he will have a very good read. Thanks for sharing!|
LikeLike
Hi there, i read your blog from time to time and i own a similar one and i was just curious if you get a lot of spam feedback? If so how do you stop it, any plugin or anything you can recommend? I get so much lately it’s driving me mad so any help is very much appreciated.|
LikeLike
It’s remarkable to go to see this website and reading the views of all colleagues concerning this post, while I am also zealous of getting familiarity.|
LikeLike
Hey There. I found your blog using msn. This is a really well written article. I will be sure to bookmark it and return to read more of your useful information. Thanks for the post. I’ll certainly return.|
LikeLike
I am in fact thankful to the holder of this web page who has shared this great piece of writing at at this time.|
LikeLike
I simply could not go away your web site before suggesting that I actually enjoyed the standard info a person provide for your guests? Is going to be again steadily in order to investigate cross-check new posts|
LikeLike
I must thank you for the efforts you’ve put in penning this site. I’m hoping to check out the same high-grade content by you later on as well. In truth, your creative writing abilities has inspired me to get my own, personal blog now ;)|
LikeLike
I have read so many articles or reviews regarding the blogger lovers except this post is truly a pleasant post, keep it up.|
LikeLike
Do you mind if I quote a few of your articles as long as I provide credit and sources back to your website? My blog is in the very same area of interest as yours and my users would definitely benefit from a lot of the information you provide here. Please let me know if this ok with you. Thank you!|
LikeLike
I’m not that much of a online reader to be honest but your sites really nice, keep it up! I’ll go ahead and bookmark your website to come back in the future. All the best|
LikeLike
Quality articles is the crucial to attract the visitors to go to see the web page, that’s what this web page is providing.|
LikeLike
Hello there! This blog post couldn’t be written much better! Looking at this article reminds me of my previous roommate! He always kept preaching about this. I’ll forward this article to him. Fairly certain he’ll have a great read. Thanks for sharing!|
LikeLike
Thanks for sharing your thoughts. I truly appreciate your efforts and I am waiting for your next write ups thank you once again.|
LikeLike
Excellent post. I definitely love this website. Stick with it!|
LikeLike
This info is invaluable. How can I find out more?|
LikeLike
Hello! I could have sworn I’ve been to this website before but after reading through some of the post I realized it’s new to me. Nonetheless, I’m definitely delighted I found it and I’ll be bookmarking and checking back frequently!|
LikeLike
Hello, i feel that i noticed you visited my weblog so i got here to go back the want?.I am attempting to in finding things to improve my web site!I suppose its good enough to use a few of your ideas!!|
LikeLike
you’re really a good webmaster. The site loading speed is amazing. It seems that you are doing any unique trick. Furthermore, The contents are masterpiece. you have performed a fantastic task on this subject!|
LikeLike
Admiring the commitment you put into your site and in depth information you present. It’s good to come across a blog every once in a while that isn’t the same unwanted rehashed information. Excellent read! I’ve bookmarked your site and I’m including your RSS feeds to my Google account.|
LikeLike
A person necessarily help to make seriously articles I would state. This is the first time I frequented your web page and thus far? I amazed with the research you made to create this particular put up extraordinary. Fantastic activity!|
LikeLike
Great blog you have got here.. It’s difficult to find quality writing like yours these days. I really appreciate individuals like you! Take care!!|
LikeLike
Does your site have a contact page? I’m having trouble locating it but, I’d like to shoot you an e-mail. I’ve got some creative ideas for your blog you might be interested in hearing. Either way, great blog and I look forward to seeing it expand over time.|
LikeLike
Why users still make use of to read news papers when in this technological globe the whole thing is presented on web?|
LikeLike
This is very interesting, You’re an overly professional blogger. I’ve joined your feed and look forward to searching for more of your wonderful post. Also, I have shared your website in my social networks|
LikeLike
Thank you for some other informative website. The place else may I am getting that kind of information written in such a perfect approach? I have a undertaking that I am simply now running on, and I’ve been on the look out for such information.|
LikeLike
When I initially commented I clicked the “Notify me when new comments are added” checkbox and now each time a comment is added I get three e-mails with the same comment. Is there any way you can remove people from that service? Bless you!|
LikeLike
Hello, the whole thing is going perfectly here and ofcourse every one is sharing facts, that’s really good, keep up writing.|
LikeLike
This blog was… how do you say it? Relevant!! Finally I have found something that helped me. Thank you!|
LikeLike
Hello! This is my first visit to your blog! We are a group of volunteers and starting a new project in a community in the same niche. Your blog provided us beneficial information to work on. You have done a marvellous job!|
LikeLike
Magnificent items from you, man. I have bear in mind your stuff prior to and you are just too magnificent. I actually like what you’ve acquired here, certainly like what you are saying and the way in which during which you are saying it. You are making it enjoyable and you still care for to keep it sensible. I cant wait to read far more from you. This is actually a tremendous site.|
LikeLike
Hey there I am so excited I found your web site, I really found you by accident, while I was browsing on Google for something else, Regardless I am here now and would just like to say cheers for a remarkable post and a all round exciting blog (I also love the theme/design), I don’t have time to read it all at the minute but I have book-marked it and also added your RSS feeds, so when I have time I will be back to read a great deal more, Please do keep up the fantastic work.|
LikeLike
Hi there! I know this is kinda off topic but I’d figured I’d ask. Would you be interested in exchanging links or maybe guest authoring a blog post or vice-versa? My blog goes over a lot of the same topics as yours and I believe we could greatly benefit from each other. If you might be interested feel free to shoot me an email. I look forward to hearing from you! Excellent blog by the way!|
LikeLike
I have been browsing online more than 2 hours today, yet I never found any interesting article like yours. It’s pretty worth enough for me. Personally, if all webmasters and bloggers made good content as you did, the internet will be much more useful than ever before.|
LikeLike
Hi there just wanted to give you a quick heads up and let you know a few of the images aren’t loading correctly. I’m not sure why but I think its a linking issue. I’ve tried it in two different internet browsers and both show the same outcome.|
LikeLike
Thank you for the good writeup. It actually was a leisure account it. Glance complex to more added agreeable from you! However, how can we keep up a correspondence?|
LikeLike
Hello there! I know this is kinda off topic but I was wondering if you knew where I could find a captcha plugin for my comment form? I’m using the same blog platform as yours and I’m having difficulty finding one? Thanks a lot!|
LikeLike
There is definately a lot to know about this subject. I really like all the points you made.|
LikeLike
After I initially left a comment I appear to have clicked the -Notify me when new comments are added- checkbox and now whenever a comment is added I receive four emails with the same comment. There has to be an easy method you are able to remove me from that service? Kudos!|
LikeLike
Hey I am so grateful I found your website, I really found you by mistake, while I was looking on Askjeeve for something else, Anyways I am here now and would just like to say kudos for a fantastic post and a all round interesting blog (I also love the theme/design), I don’t have time to read it all at the minute but I have book-marked it and also included your RSS feeds, so when I have time I will be back to read much more, Please do keep up the superb job.|
LikeLike
If you want to get much from this piece of writing then you have to apply such strategies to your won website.|
LikeLike
Quality articles or reviews is the important to interest the people to pay a visit the site, that’s what this website is providing.|
LikeLike
May I just say what a relief to uncover a person that truly knows what they are talking about on the web. You certainly realize how to bring a problem to light and make it important. More and more people have to check this out and understand this side of your story. I can’t believe you are not more popular given that you certainly have the gift.|
LikeLike
magnificent points altogether, you just won a new reader. What could you suggest in regards to your publish that you made some days in the past? Any sure?|
LikeLike
add this line to the vmx to set firmware as EFI:
firmware="efi"LikeLike
OK, problem solved. Once I installed a trial version of Workstation Pro, the ability to designate the CR VM HDD as SATA and the firmware as EFI, I’m able to boot right into CloudReady. Jeees. Probably spent 15 hours trying to get Workstation Player to work, to no avail.
LikeLike
I upgraded to the VMWare Pro 15 trial. Changing the HDD SATA setting didn’t work for me. I upgraded the VM from version 11.x to 15 and it booted right up.
LikeLike
I followed your instructions precisely, but when I boot the CR VM at conclusion of installation, I just get a black screen in with no error messages. A couple of things I’m unsure of though. There seems to be no setting in the CR VM that allows me to enable EFI, like the radio dial that exists in VirtualBox. Also, does the virtual HDD that is created in the CR VM need to be SATA? When I create the VM for CR, it populates the machine with a SCSI drive with no alternative to choose otherwise. Only after I’ve done this am I able to go back in and add a second HDD that is SATA. Should I be flashing to the added SATA drive and deleting the original SCSI drive?
LikeLike
A little more research reveals that (in Workstation Player but not Pro) you have to modify the .vmx file by adding the following lines:
firmware = “efi”
uefi.secureBoot.enabled = “TRUE” [or “FALSE” in our case]
uefi.allowAuthBypass = “TRUE”
bios.bootDelay = “7000”
The delay gives you enough time to press F2 so that you can get into efi.
So now I have efi enabled, but I still get the same behavior, the black screen with no error message. Tried by both ways, SCSI and SATA, to no avail. Interesting to note that that regardless of HDD type, efi doesn’t reference a SATA drive, only SCSI.
LikeLike
Is it possible to install vmware tools on a Cloudready VM? If so, how, w/o an optical drive?
LikeLike
You could technically extract the tools (manually, in the host, using 7zip etc.) and put them on a USB storage drive and mount it on the cloudready vm. but the tools themselves wont install.
if you know how to install VMware Tools on a CloudReady VM, do let me know!
LikeLike