Why are all the good things illegal, expensive or fattening?
With the best customizations being mostly for root users, you might feel a bit left out. Why? You’ve read it all but still no root. So, today I’ll be answering this question. How to root your Android smartphone. I’ll be showing you the most effective, straightforward and errorless method of rooting. Let’s start.
When it comes to rooting, you first need to acknowledge whatever you do is at your own risk. Loads of people search for methods to root and then back out at the last steps since it looks too scary and risky. And then they end up with a bricked phone. But if done correctly, there is zero risk involved.
So first of all, what is root?
Android is an OS. To know what root is, we need to know exactly how an OS works. (Feel free to skip this bit if you’ve read all this) Android runs on what is called the “Linux Kernel”. Think of it as a translator. It directly talks to the hardware (i.e. processor) and gets the job done. But there are certain commands which it isn’t “allowed” to perform for the average user, for his/her own safety. Further, all the apps you have installed are like different users (to the OS they most definitely are!), when you download and app and you grant permissions, you’re basically defining what it can do (or more technically what the kernel can be asked to do). To obtain full control of the kernel is called rooting. Rooting is much like administrator rights on Windows, it- like admin rights –gives the user elevated privileges to view, control, modify and even go-over-the-limit with the device. Meaning that the user gets a whole new world of possibilities after rooting. Hold on! Windows has administrator rights built-in, right? So why not Android? Why wasn’t the device rooted when you bought it?
The reason lies in android’s free-ness. All the big manufacturers like to tweak the OS to their own devices. Sometimes annoying and almost all the time just glitter, these tweaks may even slow down the device. They want your device to be apart from the official android and compel you to buy them. Let’s say you like the Touch Wiz on Samsung. But you might have still noticed that you still can’t uninstall the default apps (you may or may not find a disable option). For example, you bought an S4 (or any device) all those years ago. ‘Twas good, that’s obviously why you bought it and that’s the end. But Samsung don’t like us forgetting that it’s “the Galaxy S4”, oh no! They want our life to revolve around the device, chanting Samsung and all that crap. And rooting would obviously be the end of it. Plus, some manufacturers purposely “Under-clock” their devices (stock) to keep out any trouble! (Don’t worry! Big brands like Samsung do not do this) I know, sounds stupid right? Well, you see, in their view: they know that their devices might break within warranty if used to the fullest, so they limit performance. This, among other reasons, why I recommend rooting. When you root your device, you cut whatever strings you had with the manufacturer (that’s right, even the warranty).
For some, it may be the difference between 99% and 100%, but for others it maybe earth and heaven (especially low-end devices, where the dwindling resources are used up by the stock apps leaving no room for your apps). If you’ve longed to use the much faster Google apps, then I’ll teach you to cut the road.
That’s the “what” solved. Now moving on to why?
I won’t even begin describing the possibilities of root. But I will list the best ones: you can always run the latest Android version, uninstall system apps, have a different lock-screen, use hacking tools (like “Cheat Engine”, “Lucky Patcher”, “X Mod Games” etc.), change boot animations, overclock your device, install a custom recovery and many many many MANY more (even install Windows RT!).
So, stat count, “what”-done, “why”-done. Now how ‘bout “how?”
Let’s establish a few things shall we? First of all the full procedure is to be undergone at your own risk. I will not be taking responsibility for what happens to your device (I am not a talking warranty either). Secondly, if all the steps are followed correctly, you will have a successfully rooted phone with no errors what-so-ever. Thirdly, you will have to “Hard Reset” your device. Why? All the apps you installed, all the settings you changed will crap the rooting procedure. If you do this without rooting, you will most probably get the “root authentication error”. As this is one of the most crucial steps, if you get this wrong, you might end up with a hard-bricked device. And finally, if you tried to root in any other method before, you must un-root your device (even if you got something wrong when you tried to root it: try to remove root access (most apps offer a de-root option). If you used the normal flashing-a-root-file method, establish whether you got a custom recovery or not. If you made any attempt to root before I am not guarantying that this will work.
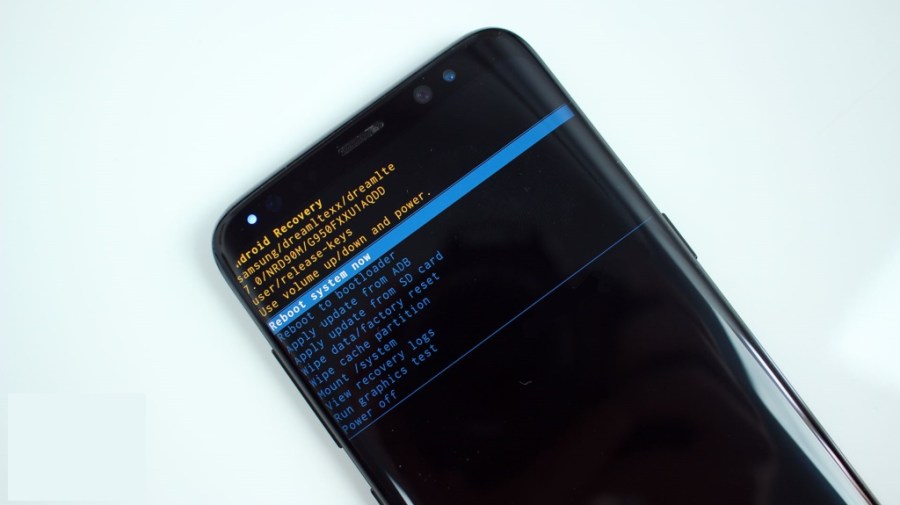
As I mentioned above, I will be showing you the easiest and risk free method. First of all, backup any needed (contacts, messages etc.) use Helium backup to backup apps including the app-data. Then remove your SIM, and SD Card. Power-off your device and boot into recovery (for Samsung, it’s “Volume UP + Home + Power” in that order). Find “Factory Data Reset. Wipe /DATA Partition” (Samsung, move up, down using volume and select using power key. If it is not a Samsung, the instructions might be displayed on the first page of the recovery). Wait ‘till it comes back to the recovery or restarts.
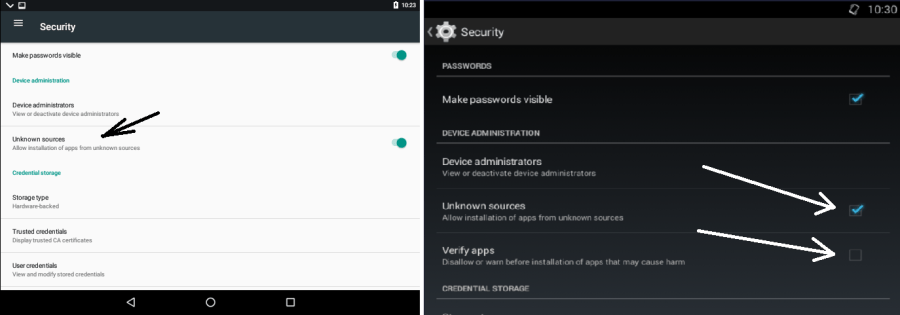
Go through the setup as usual, but mind NOT to sign into Google (nor any other accounts). Then select unknown sources and untick verify apps (Settings > Security > tick “Unknown Sources” > untick “Verify Apps”).
Next, charge your device fully (and keep it charging).
Then download KingRoot from the link given at the bottom (even if you got a previous version or if you got it from another repository, download this one). Install the app and connect to Wi-Fi (or cellular, but Wi-Fi is better). Open KingRoot and follow whatever steps ‘till you get this screen (click “try root”. procedure will take anything from ten seconds, to a few minutes). If it tried to root but failed or, if it says it can’t find root stratergy, uninstall KingRoot 😦 .
|KINGROOT|

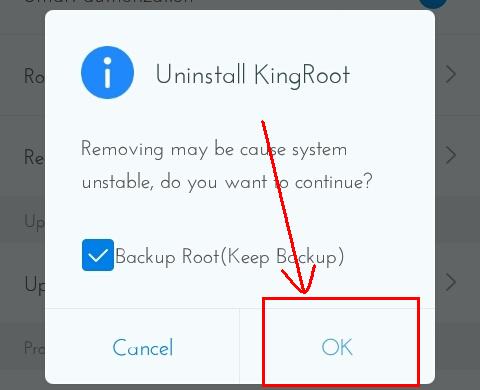
If you got any errors, go to KingRoot settings > Uninstall KingRoot > Continue > Keep Backup.
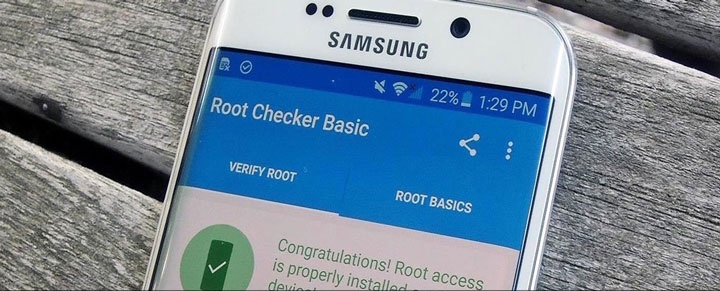
And try to root another time. But if all did go well, you now have a fully rooted device. Check for Root Access using root cheker. As an added precaution, check your device for any behavioral changes (e.g. can’t turn off, apps keep crashing etc. OR if root checker gives any errors, un-root using above method). If you find any, un-root the device (above method). Also- if all is well –don’t grant root access to any stray apps.
That’s it folks, a no-strings-attached-green-bot lies in your hands humming with the raw power waiting to be unleashed! Do whatever you fancy! (Responsibly, of course). I really hope that helped you. 🙂
Always remember! With great power, comes a greater electricity bill! 😉

You must be logged in to post a comment.