When the new SSD for my Workstation arrived i knew I would have to install Windows, then copy all my stuff and all that lot. So I thought that there must be a better way to install Windows without going through the setup wizard. I searched around and meddled with process. Forty five minutes later, I had a working Windows 10 and a whole freakin’ hour saved. So today I’ll share my method on how to do this (mind you, my method needs a working Windows Vista or above computer, unless you wanna dual-boot).
I’ll be taking Windows 10 as an example. If you are reading this guide hoping to dual boot an already Windows running PC, steps will be provided for that as well.
|EasyBCD| (password is “hellohelp” without quotes) if you are hoping to dual boot, download this.
|DISM| that’s how we’ll apply the image (you don’t need to get it if you are running on Windows 8 or above)
Download the above resources as necessary. I’ll be assuming that you already have a Windows install disc or an ISO file. First, extract the “install.esd” file (or if you have an “install.wim” file extract that) to a directory (folder).
If you had an “install.esd” file, use 7zip to open it. Then check for an xml file. If you found one, open it up, and read what it says (you’ll have to extract that file first).
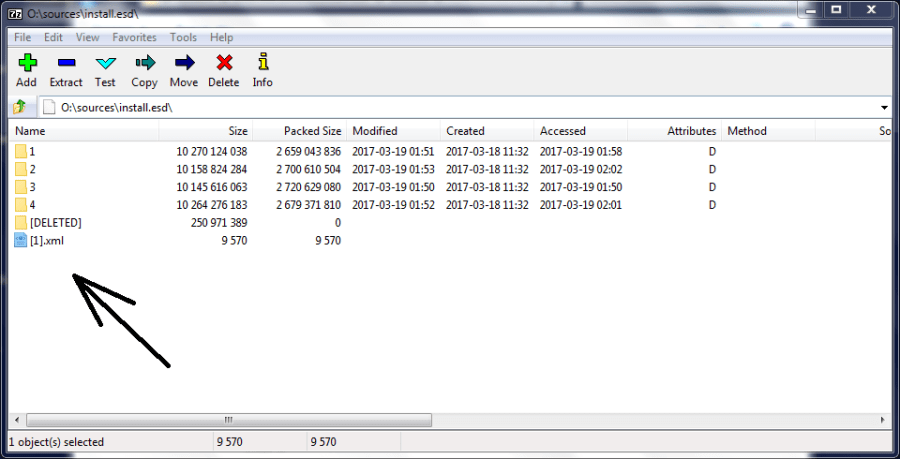
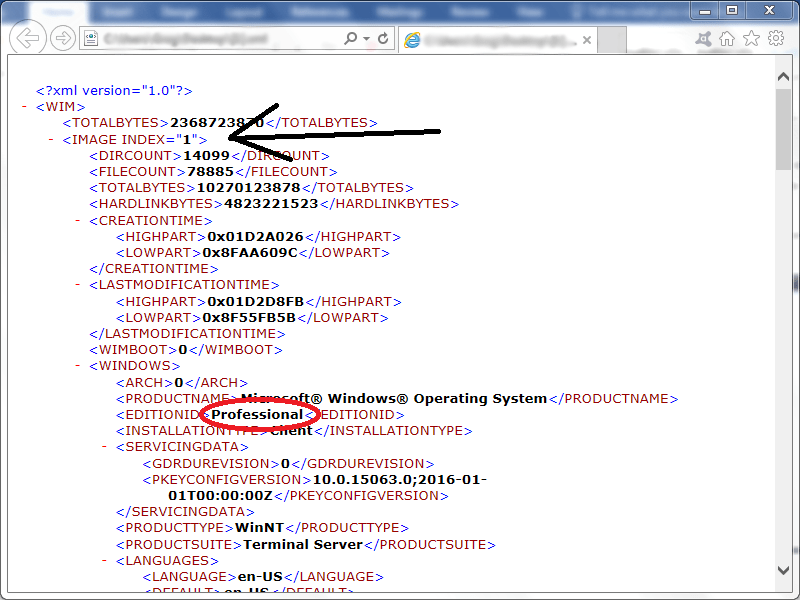
Look for “<IMAGEINDEX>1<IMAGEINDEX>”. Read the version under it (circled in red). Remember the index number of the edition you want to install (for me it will be 1).
If you are planning to install Windows on a separate hard disk, plug in that disc. Assuming that it is a new hard disc, prepare two partitions using disc management (Right click This PC > Management > Disc Management). A 100MB partition called “System Reserved” with the letter “Q”, make this partition “active” and also make sure that it is at the beginning of the disc. Then format rest of the space as a partition called “Windows” lettered “Z”. If you are planning to dual boot, prepare an empty partition (format it to NTFS) and letter it as “Z”.
Extract the contents in DISM.zip to “C:DISM” (do this only if you are under Windows 8). Then run this command in an elevated command prompt without the quotes.
“cd C:DISM”
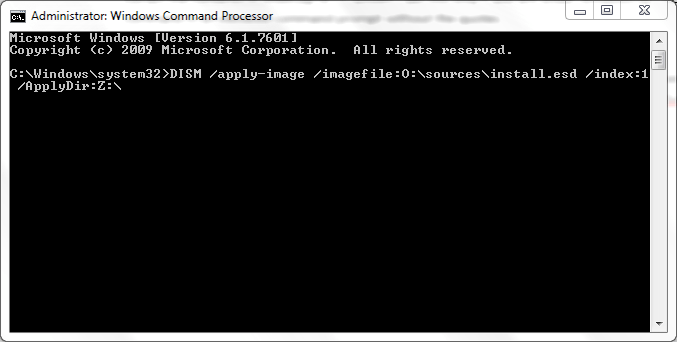
Open an elevated command prompt (those of you who didn’t open it before because you were running Windows 8 or above) and type in the following command. We are assuming that the “install.esd” file’s path is “O:sourcesinstall.esd”, if it is different, change it to your path. (No quotes)
“DISM /apply-image /imagefile:O:sourcesinstall.esd /index:1 /ApplyDir:Z:”
- If you used an “install.wim” file, don’t use “/index:1”
- Replace “/index:1” with the index number you remembered from the xml file
- Replace “install.esd” with “install.wim” if you had a WIM file
When it is all done, the CMD will return to command syntax with the following message “All Operations Completed Successfully”.
Now this is when separate hard disk and dual-boot part ways. I’ll first follow-up on new installs on a separate hard disk the get back to dual-booting.
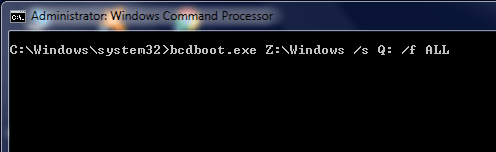
If you are installing on a separate HDD, you’ll remember that I instructed you to create a new partition called “System Reserved” lettered “Q”. Now open up a CMD with admin rights (then navigate to the “C:DISM” folder if necessary) and type in the following command (no quotes) assuming that the Windows (new) partition is called “Z:”
“bcdboot.exe Z:Windows /s Q: /f ALL”
- Note that you can change “Z” and “Q” to whatever letters you assigned
- You can skip “/f ALL” if you like (or change it to “/f BIOS” or /f UEFI”)
Now plug in that hard disc back on to the target PC and boot it up. If all went well, the Windows logo should come up.
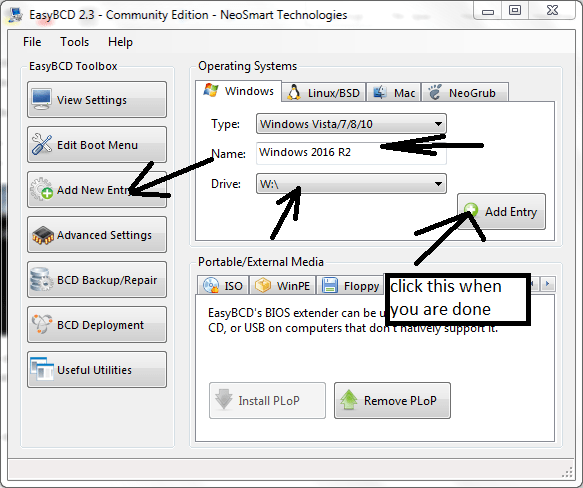
Now then, back to the dual-boots. Install EasyBCD and open it up. Click on the “New Entry” tab. Enter the name of the Windows OS in “Name:” the correct drive (in my case it will be “W:”). And finally hit “Add Entry”. Reboot your PC and voila! Your new OS will be there.
If you get digital certificate errors when you boot up the new OS, replace the “bootmgr” you already have with the “bootmgr” provided in the “EasyBCD.7z” file. This will involve un-hiding the System Reserved partition, the replacing the “bootmgr” file (Read how to unhide the System Reserved partition HERE. As this is a hassle, I strongly recommend using the traditional method of going through the setup wizard (you know, with the DVD/USB and all that sorta’ stuff).
I really hope that that helped someone. Cheers! 🙂

You must be logged in to post a comment.