Bluestacks is among the best emulator ranks awarded with the “Medal of Compatibility”. That is to say that it is compatible with many devices. Although it is so, it is not the best. By far it is one of the most basic app players in the market. Essentially you cannot install Custom Firmware, you can’t change kernel values and a lot more where those came from!
We’ve written this, with not the aim of hating BS, but of teaching how to make the most of it! We assume that you have already (at least) got it installed (maybe stuck on setup wizard?) and that you have a PC which meets the minimum system requirements (2GB RAM, OpenGL 2.0, Dual Core CPU etc.).
And all this is meant for a Windows PC, (although some might work on other platforms!).
Editing Registry of Bluestacks
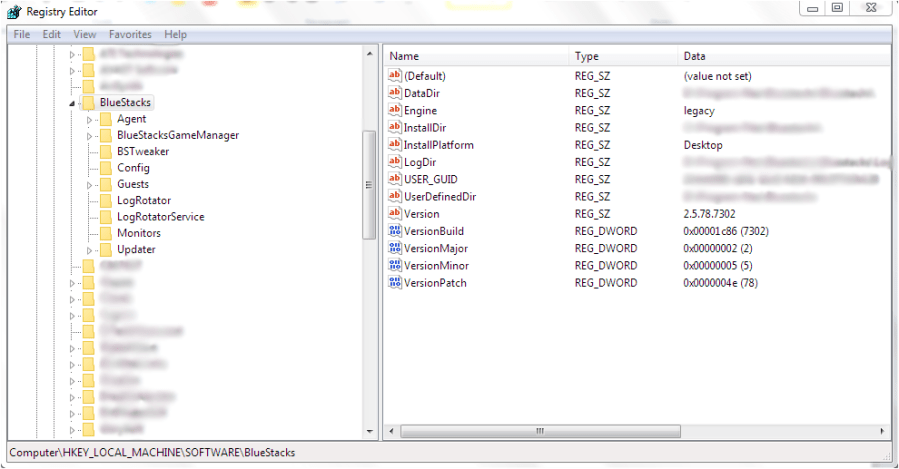
Editing the registry might be your worst nightmare, but once you get used to it you’ll have lots of fun! Mind to only edit the entries I tell you to (for now). To open the registry, press the Win key + R and type in “regedit” (or type that in the search bar). First off open the BS entry [HK_LOCAL_MACHINE > SOFTWARE > BlueStacks] and double clicking on that entry.
Android
You won’t find anything of much use there. The most useful entry would be in [BlueStacks > Guests > Android]. There you’ll find the memory option (to modify, right click > Modify > tick radio button Decimal > %VALUE%. For %value%, anything below half your device’s total RAM)
Guest Config
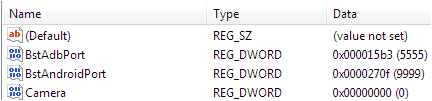
Double clicking on Android and going in to Config, you’ll find many-a useful thing.
Chances are you don’t have a webcam attached to your device (if you don’t have a laptop) and BS wouldn’t recognize external webcams. So set the value for the Camera entry as 0.
If you have a built-in (Discrete. Not integrated and not separate) GPU, you might need to skip the Graphic check as BS might generate errors (can’t set wallpaper, screen always refreshing etc.).
Scroll down to “SkipGraphicsDriverCheck” and set it as 0.

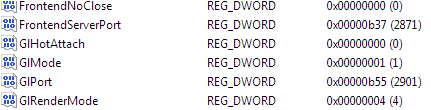
If you won’t to turn off OpenGL acceleration (due to screen refreshing etc.) set the “GLMode” to 0. PS a better fix to scrren refreshing and turning black, is to enable some fixes described Here.
There would be no need to change anything else here (unless, of course you’re the curios type).
FrameBuffer
Here, you’ll find options to change screen size, change resolution of guest etc. all relating to the display of BS.
Changing the guest resolution can be done by; changing the entries “GuestHeight” and “GuestWidth” to whatever (+ be sure to tick the Decimal radio button). But do mind you can only change to the correct ratio. For the best between speed and big-screen-factor, set the Height to 480 and the Width to 640.

You can also define whether you want to watch the nice GU animation or watch the booting stats (I’ll choose the first one!). change “HideBootProgress” to either 1 (Hide it) or 0(Show progress).

Try out the other options at your own risk! (Just kidding!)
BlueStacksGameManager
On this entry you’ll find the most interesting features.
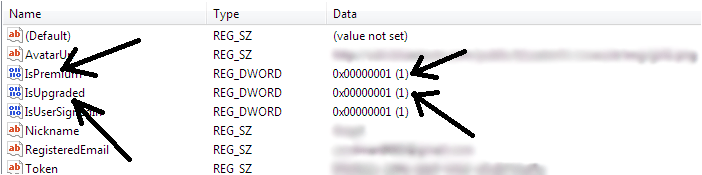
If you are an offline Joe (have a PC with no internet access), you might be stuck at the BS account create page. Have no fear! Just download this onto a device with Internet access (or copy the text file and save it with a .reg extension) and double click on that. It’s that simple! Feel free to change any of the values (e.g. Token, Name, RegisteredEmail etc.)
|Text|
The “GameManager > Config” entry is where all the configurations of the BS app is kept. The most useful being “WelcomeNoteShown” set to “1” as it will stop the Welcome screen coming up every time you enter BS.

Have fun trying out the other options in that entry. Remember; always have a backup of BS registry! [Right click the entry (on left panel) > Export > Save].
Getting Premium for free can be done by setting the values (in User entry) for “IsPremium” and IsUpgraded” to “1”.
Feel free to explore! But always have a backup.
Editing OEM.cfg File
Some more useful features can be found in the Oem.cfg file (normally in C:ProgramDataBluestacks or wherever you installed BS to). Just open the Oem.cfg file through notepad (just drag ‘n’ drop) and start editing.
You will find options for disabling the Chat and GoLive buttons on BS panel, show advanced options in right click menu of tray icon etc.
To disable Chat and GoLive, just set the entries:
“<IsAddGoLiveButton>false</IsAddGoLiveButton>”
“<IsAddChatButton>false</IsAddChatButton>”
To “false” (I’ve already done that). Just change the middle part in between “>” and “<” that says “true” to “false”. The end output should look like above^.
Remember to Save the file (Ctrl+S) before exiting!
To get more options in tray icon, change the following:
“<IsOnlyStopButtonToBeAddedInContextMenuOFSysTray>false</IsOnlyStopButtonToBeAddedInContextMenuOFSysTray>”
To “false” (I’ve already done mine) follow above steps to do so. End output should look like above.
Remember to Save the file (Ctrl+S) before exiting!
Try different combos, but always have a backup of the Oem.cfg file.
Custom Tools
Use tools that are available to tweak BS. The best tools I’ve found are BS Tweaker and BS Easy. You can learn how to root BS using BS Tweaker Here. Be warned that BS easy cannot be used for rooting BS anymore! So I’ve prepared a 15MB 7Zip file (as opposed to the 120MB file they give) that will do most of the functions (like preparing Xposed Environment, changing RAM size etc.) but you cannot Root BS (and trying is not possible as I’ve gotten rid of the RootMod module).
Tweaker can be used to do many things, such as; browsing/deleting/adding BS files, compress BS Virtual Disk, change DPI, change fake device model (S5, Note3, Note 2, Moto X, Asus) etc.
|BS Tweaker| only for BS 2.5 and up
|BS Easy|

You must be logged in to post a comment.