As I’ve mentioned in a post long ago, Android x86 can be installed on USB devices. The “HOW?” sector is a bit harder than that.
Lately I’ve been searching on forums for methods to do just that. But all the sites claim you can achieve that by first formatting the USB to EXT3 then installing Android. Just two problems, one, Android along with all Linux based OSes use EXT4 file system. And two, EXT formats are not detected by Windows computers. So, that turned out to be a big no-no. With a damp heart I began to research on my own. And here it is, a way to use Android on your USB. I also recommend you to use a release that is not in “RC” stage but one in “Release” stage (or having a higher “Release Candidate” value. E.g. RC4). I used the CM 13 build of Android as it is pretty bugless and customizable (And it is R1).
|Android x86 CynagonMod CM 13|
The path to your goal is a bit hard, but great for peeps with 4GB USBs. For this method, you will need 2 USBs (or one USB and a CD/DVD). One to hold the Android ISO and another as the install location. For the container drive I recommend at minimum a 1GB USB (or a CD/DVD). And for installation, anything with above 4GB of free space.
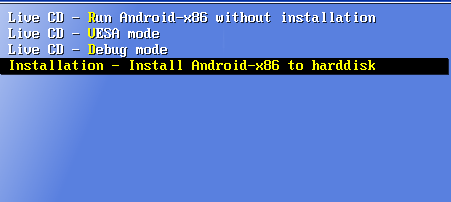
Firstly, image the ISO file of Android x86 onto the container USB/CD/DVD. Then boot your PC from that USB. Select “Install Android x86” in the boot menu.
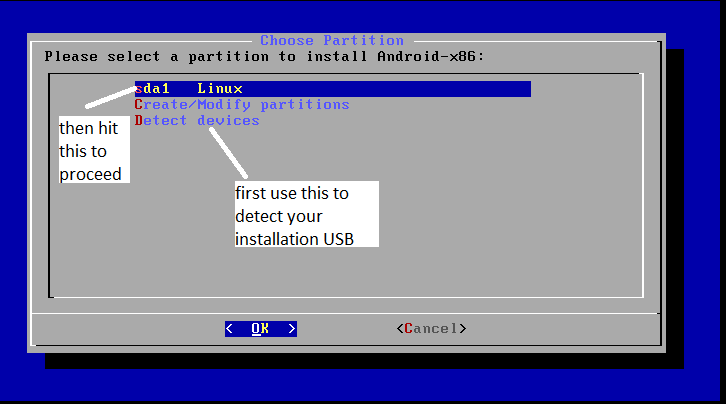
When it comes to a GUI display, Plug in the second USB (Installation) and hit “Detect devices”. Once it detects your second USB device, highlight it and hit it to use it (helpful tip: before plugging in the second USB, remember the first USB’s ID (e.g.”sda”). then when the second USB is plugged, choose the one that is NOT the first USB’s ID (e.g. “sdb”) that way, you won’t format the wrong USB).
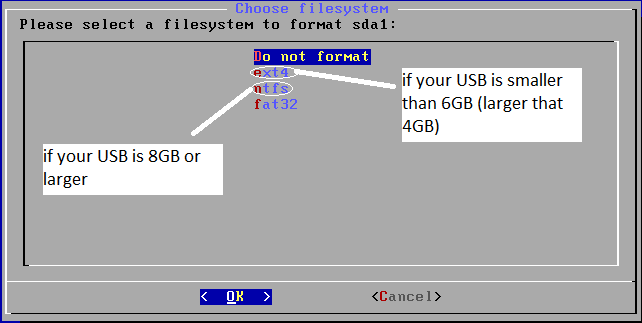
Now here’s where some of you part ways. If you used a small USB (4GB – 6GB), hit “Format to EXT4”. If you used a bigger (8GB or more) USB, use the “Format to NTFS” option. It will ask for a confirmation massage in which you have to choose “YES”.
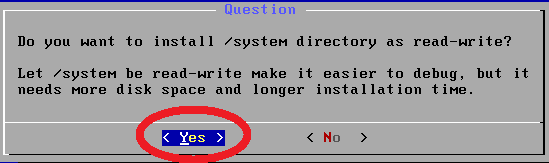
Once it’s done formatting, it will ask to install “GRUB Bootloader” in which you have to select “YES” (It might ask “Install GRUB2 EFI” only select this if you have a UEFI computer). Then it will ask to make “/system directory read-write”, hit “YES” as this is the most crucial step (choose “NO” and you’ll have a USB which permanently read-only. You have been warned!).
It will install Android to the USB after that (if you were asked “Create boot option for Windows, select “YES”). If you used EXT4 back there, once the installation is complete, it will ask you to either reboot or run Android x86. You may choose either.
But if you used NTFS, you will be asked to create a “DATA.IMG” file, choose “YES” and key in the size in MB (minimum is 4GB=4096MB in order for Android to run).Once the IMG file is created, you will be prompted to a reboot or “Run Android-x86”. You may choose either.
If it all went well, you will now be running Android from a USB. Do whatever you please, just as you would if you’d installed on a hard-disk.
Just keep in mind that the setup screens will be agonizingly slow and crappy (it will tell you several times that “Process system has stopped” or something like that, don’t click “close app”, just hit “wait” or even “mute until device restart”). I assure you that after the setup, Android x86 will run smoothly (But if you use a sub-par device with a slow port (USB 1.0) it will fail to work entirely 😦 ).


Tip: Use a high-end USB, like one built for Windows-To-Go, or one that’s been proven to work with high I/O live OSes. If you use a cheap one, you’ll end its life pretty soon :-(.


Note: You may use a 4GB USB if you plan to use anything below Lollipop, but be sure to use EXT4 as the file format! You also have to boot your computer from the USB if you want to use Android!
NOTE: I’ve tested this on the following Pen drives: Kingston DT Series, Kingston DT Workspace Series, Imation IronKey™ Workspace W300 / W500 / W700, Spyrus Portable Workplace, WD My Passport Enterprise, Samsung Evo Series.
I don’t recommend ADATA and SandDisk devices (too many I/O bugs).

Hi! I simply want to give you a huge thumbs up for your great info you’ve got here on this post. I will be coming back to your site for more soon.|
LikeLike
It’s a pity you don’t have a donate button! I’d definitely donate to this brilliant blog! I guess for now i’ll settle for bookmarking and adding your RSS feed to my Google account. I look forward to brand new updates and will share this site with my Facebook group. Talk soon!|
LikeLike
Peculiar article, just what I needed.|
LikeLike
I loved as much as you’ll receive carried out right here. The sketch is tasteful, your authored subject matter stylish. nonetheless, you command get bought an shakiness over that you wish be delivering the following. unwell unquestionably come more formerly again as exactly the same nearly very often inside case you shield this hike.|
LikeLike
I love the valuable knowledge you offer on your articles. I will bookmark your weblog and feature my youngsters take a look at up right here generally. I am quite positive they are going to be told a variety of new stuff right here than any one else!
LikeLike
I have learn some excellent stuff here. Definitely price bookmarking for revisiting. I wonder how a lot effort you set to make one of these magnificent informative site.|
LikeLike
Always have to comment , I can’t help myself! Thanks Ashley
LikeLike
Congratulations on having one of the most sophisticated blogs Ive come across in some time! Its just incredible how much you can take away from something simply because of how visually beautiful it is. Youve put together a great blog space –great graphics, videos, layout. This is definitely a must-see blog!
LikeLike
I like Your Site
LikeLike
I am choosing to point out to understand for one’s view about it make a difference and then leave a constructive short review on this site. With thanks so incredibly much concerning article exceptional text if you are as i am to learn from.
LikeLike
Excellent web site. Lots of helpful information here. I am sending it to several friends ans also sharing in delicious. And certainly, thanks in your effort!|
LikeLike
Wonderful, what a blog it is! This webpage gives helpful facts to us, keep it up.|
LikeLike
I am in fact glad to glance at this web site posts which consists of tons of valuable information, thanks for providing these statistics.|
LikeLike
wonderful post, very informative. I wonder why the other experts of this sector don’t realize this. You should continue your writing. I’m confident, you have a great readers’ base already!|
LikeLike
Hello there, You have performed a fantastic job. I will certainly digg it and for my part recommend to my friends. I’m confident they’ll be benefited from this site.|
LikeLike
I really like it whenever people get together and share ideas. Great blog, continue the good work!|
LikeLike
I am actually delighted to glance at this weblog posts which carries tons of valuable data, thanks for providing such statistics.|
LikeLike