Since its release a couple of years back, Chromium OS has been a favorite among low-end/old PC owners, with its simple, no-nonsense interface, cost free nature and fast and efficient performance. But with no official build from Google many have taken upon themselves to build Chromium OS. One of the better ones is Neverware CloudReady, providing a near Chrome OS interface, stable builds and regular updates. Although clean and efficient, it can be a right pain in the rear when installing with its non-standard “BIN” file format and eye watering amount of partitions. It can drive one insane if you plan to install it in a VM. That’s why you came here!
After scouring the internet for instructions on installing it on VMware Workstation, we came to a conclusion that there is no official (or for that matter, straightforward and proven) way to install it. Most people claim that they can use the linux tool “dd” to dump it. But on our tests we found that to be a tad bit difficult and time consuming (seeing as how one will need linux and quite a lot of time). So we brew our own portion: a straightforward, fool-proof method of installing Clouready on VMware products (tests on VirtualBox proved futile (no graphics) and only sometimes worked in Parallels). It’s so fool proof that you don’t even need VT-x/AMD-v. How cool is that?
To begin with, you’ll need a (separate) VM with either Windows, Mac or Linux already installed. Then you will need a marvelous little tool called Etcher (Available for all above mentioned OSs). Also, we found that working with the 32bit version of CloudReady plays better than the 64bit version (But the 64bit version is quite alright if you have a sufficiently powerful PC (with VT-x/AMD-v)that can run 64bit guests). And you will quite obviously need a VMware Product (Fusion, Workstation Player/Pro, ESXi etc.). We’ll be using VMware Fusion on an iMac Pro with a secondary Windows VM.
Note: a simplified summary of the entire process is at the bottom of the post. And here’s the accompanying video.
|Etcher|
First, extract the BIN file out of the ZIP file you downloaded into one of the shared folders of your Windows/Linux/Mac VM.
Create a VM (for Cloudready) [“linux 3.x”, minimum 724MB RAM, 20GB SATA Disk, minimum 64MB Video Memory, Accelerated Graphics, USB 3.0 controller, no Optical Drive, EFI Boot enabled (no secure boot), NAT Network Adapter]
Now assign the disk you made in the above step on to the Windows/Linux/Mac VM and power that on.
When the VM has finished powering up, initialize the new disk (using Diskpart, Disk Utilities, fdisk, GParted etc.) with an MBR partition table (I did not make a typo. That is MBR not GPT), and format it as NTFS/EXT4/FAT32.
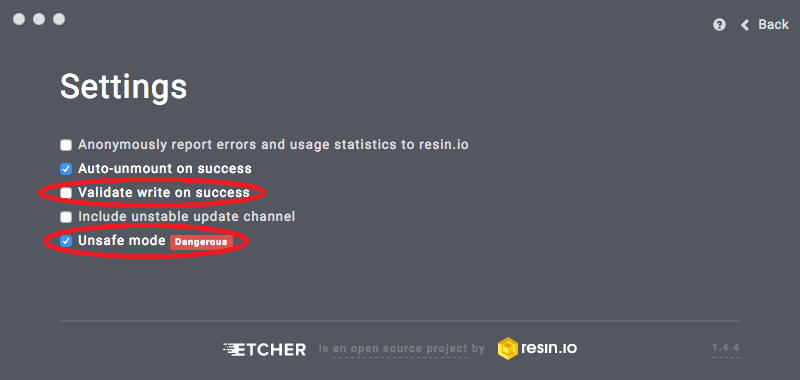
Then open Etcher inside the VM. Click on the cog wheel (Settings icon) on the top right corner.

Now set it to “Unsafe Mode” (and also disable “validate write”, to speed up the whole process)
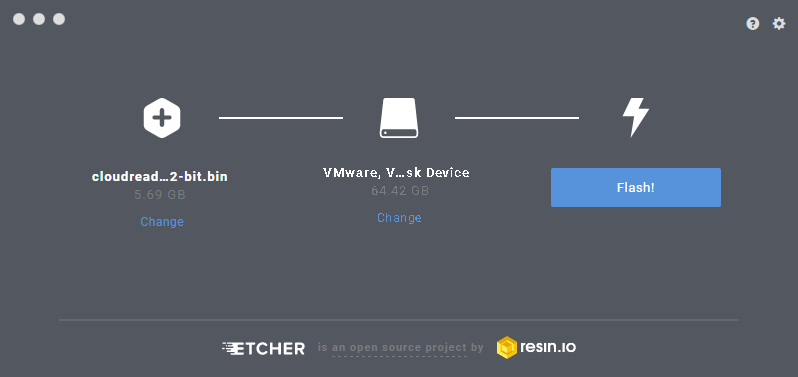
Click back. Choose the ClouReady BIN file and the disk from the ClouReady VM and click flash.
The flash will take anything between 30 Seconds to 30 minutes. Once it finishes the flash, shutdown that VM and remove the CloudReady VM’s disk.
Now focus on the CloudReady VM. Open its VMX file (using a text editor) and put the following line at the end on the file (with the quotes on “FALSE”).
mouse.vusb.startConnected = “FALSE”
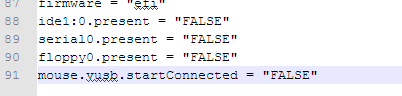
[If you’re worried what it’ll do: CloudReady has a mouse bug that makes it impossible to direct mouse clicks. This is technically the same as turning off “Mouse Integration” in VBox]
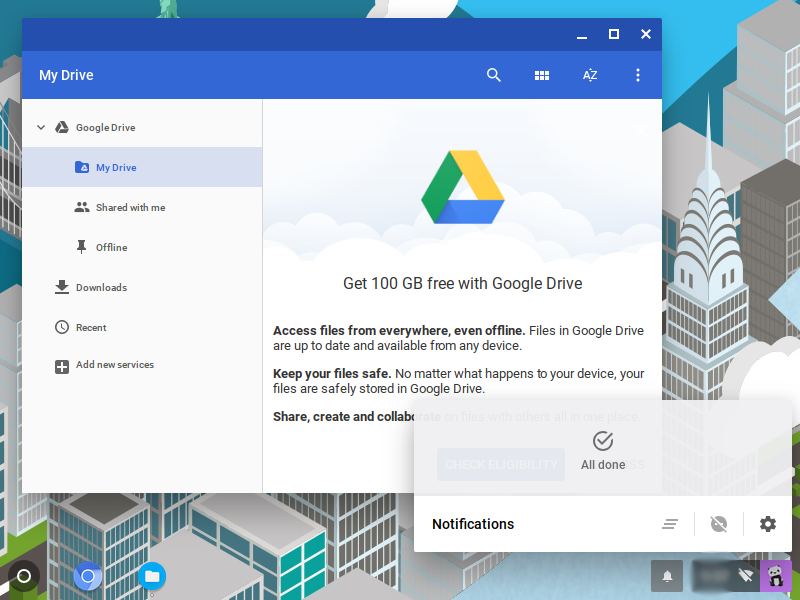
Save the VMX file and poweron the CloudReady VM. You will first get a fleeting glance at the CloudReady logo and the Startup screen in which you can login to your Google account.

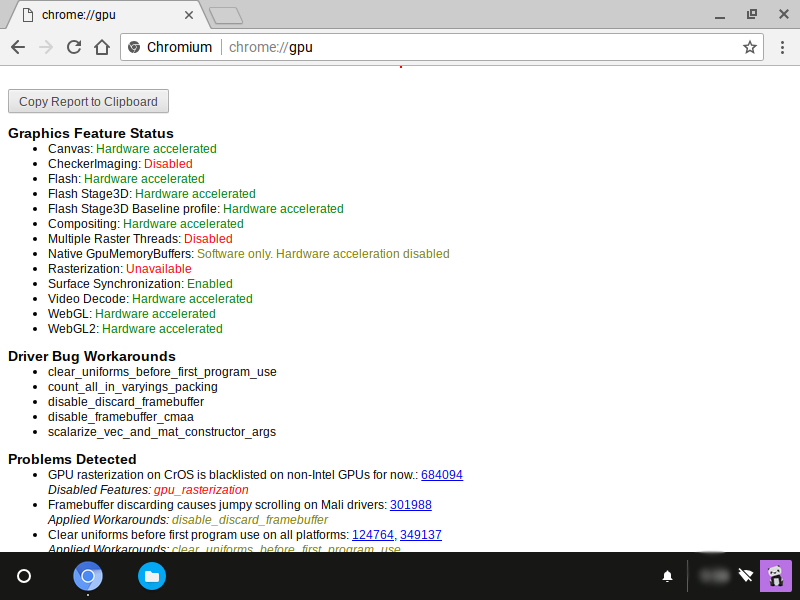
CloudReady plays best with VMware. It’s even got full WebGL 2 Hardware Accelaration.
If you found that a bit confusing, he’s the summary: Get Etcher, CR (CloudReady) 32bit image, VMware virtualization product and a separate Windows VM (not the one that you install CR in).
Attach disk of the CR VM to the Windows VM.
Use Etcher to image the CR BIN file to that disk.
Remove disk from Windows VM, attach to CR VM, Power on CR VM. Done!

I have learn several good stuff here. Certainly price bookmarking for revisiting. I surprise how a lot effort you place to create any such excellent informative website.|
LikeLike
What’s up mates, how is everything, and what you want to say on the topic of this article, in my view its actually awesome for me.|
LikeLike
I’ve learn several excellent stuff here. Definitely price bookmarking for revisiting. I surprise how much attempt you put to make this sort of excellent informative site.|
LikeLike
I love your blog.. very nice colors & theme. Did you make this website yourself or did you hire someone to do it for you? Plz respond as I’m looking to design my own blog and would like to find out where u got this from. appreciate it|
LikeLike
You’re so cool! I do not suppose I have read anything like this before. So great to discover another person with original thoughts on this topic. Really.. thanks for starting this up. This website is one thing that is needed on the web, someone with some originality!|
LikeLike
I’ll immediately snatch your rss feed as I can not in finding your e-mail subscription hyperlink or e-newsletter service. Do you’ve any? Please permit me understand in order that I may just subscribe. Thanks.|
LikeLike
Spot on with this write-up, I honestly think this website needs a great deal more attention. I’ll probably be returning to see more, thanks for the info!|
LikeLike
Thanks , I’ve recently been looking for information about this subject for ages and yours is the best I have found out so far. However, what about the conclusion? Are you sure about the source?|
LikeLike
Hi there, I found your site by way of Google whilst searching for a comparable topic, your website got here up, it seems good. I have bookmarked it in my google bookmarks.
LikeLike
Pretty section of content. I just stumbled upon your weblog and in accession capital to claim that I get actually enjoyed account your weblog posts. Anyway I’ll be subscribing to your feeds or even I achievement you get right of entry to persistently rapidly.|
LikeLike
Greetings! I know this is kinda off topic however I’d figured I’d ask. Would you be interested in exchanging links or maybe guest authoring a blog post or vice-versa? My blog goes over a lot of the same topics as yours and I think we could greatly benefit from each other. If you might be interested feel free to shoot me an e-mail. I look forward to hearing from you! Wonderful blog by the way!|
LikeLike
I do not even know how I ended up here, but I thought this post was great. I do not know who you are but definitely you are going to a famous blogger if you are not already 😉 Cheers!|
LikeLike
It’s a shame you don’t have a donate button! I’d without a doubt donate to this outstanding blog! I guess for now i’ll settle for bookmarking and adding your RSS feed to my Google account. I look forward to fresh updates and will talk about this website with my Facebook group. Talk soon!|
LikeLike
I’m really impressed with your writing talents and also with the format to your blog. Is that this a paid subject or did you modify it yourself? Anyway stay up the excellent quality writing, it is uncommon to see a great weblog like this one these days..|
LikeLike
I am genuinely grateful to the owner of this site who has shared this great paragraph at at this time.|
LikeLike